Showing posts with label hair how to. Show all posts

Thursday, September 6, 2012

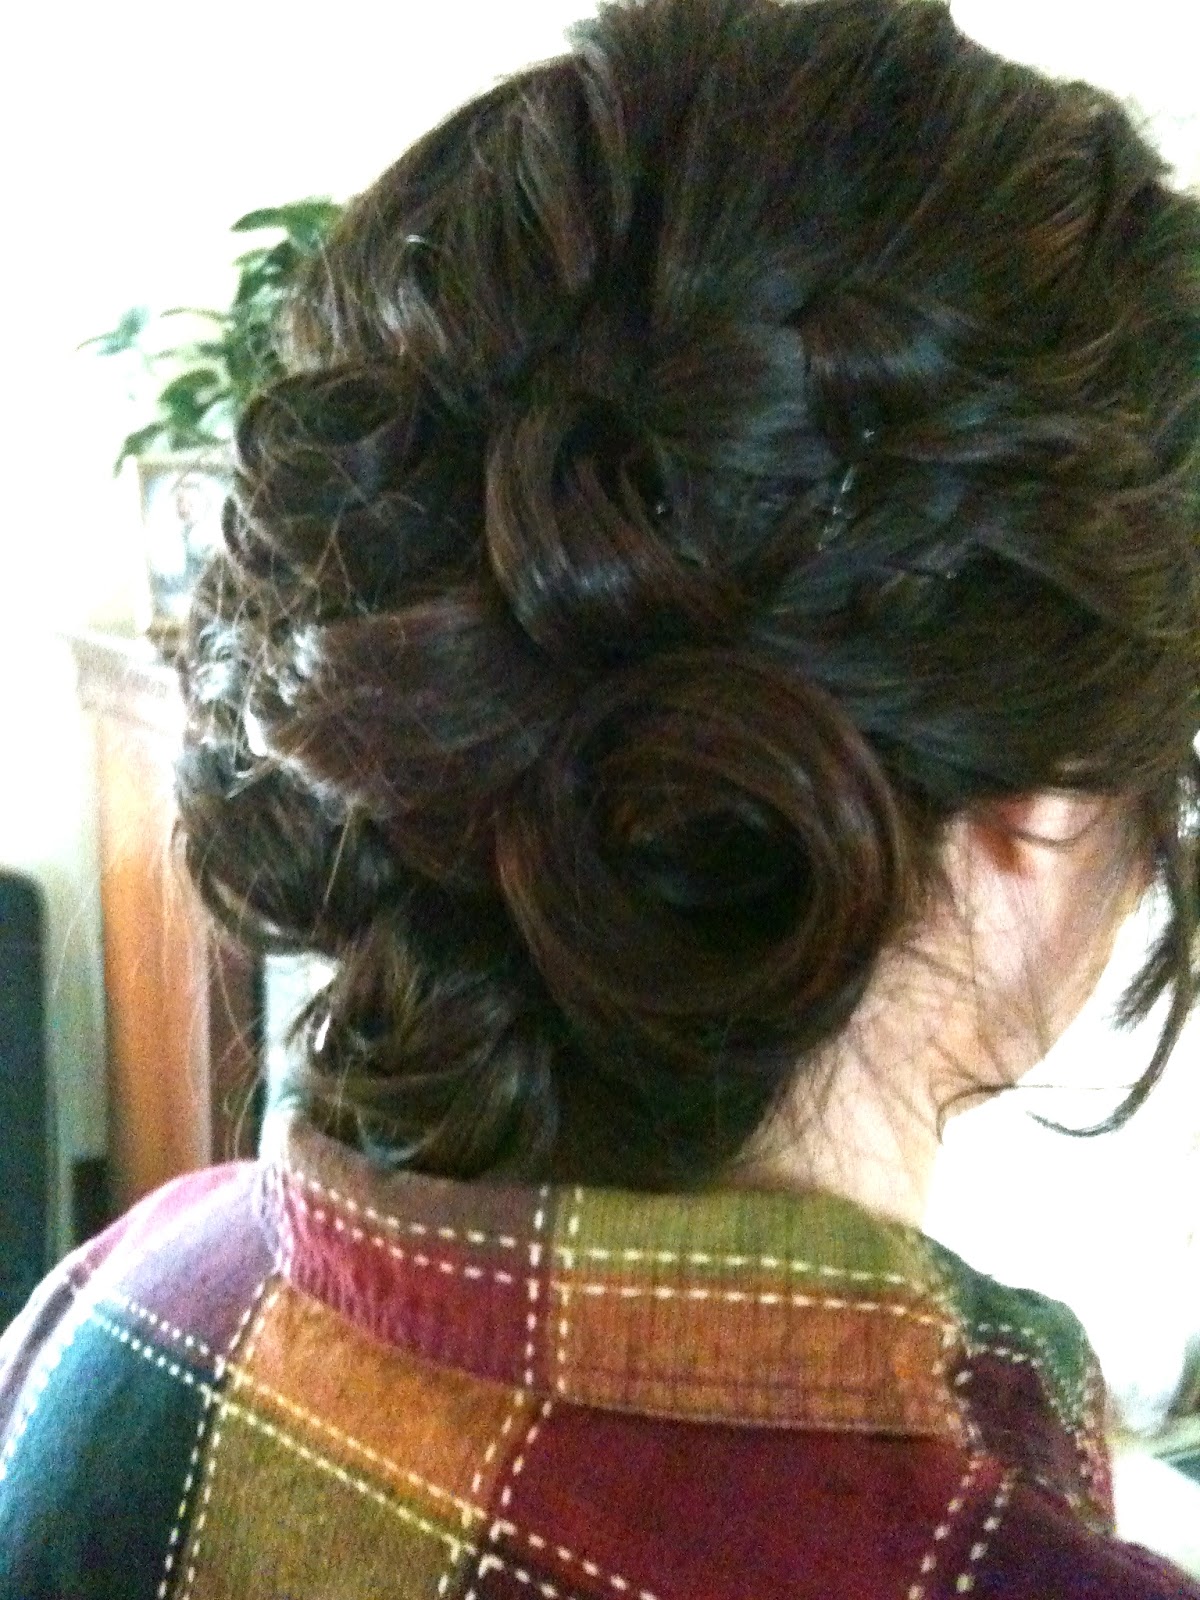
Bun done been braided!


How to!

Begin a french brad at the crown of your head on either the right or left side. As you can see, I chose to begin on my left side.

TIP: Swoop pieces into the braid from the level that you are currently braiding. For example, if you are still at the crown of your head, don't grab hair from below your ear. Instead, use hair more toward the top of your head. 

Pull hair to one side as you braid down your head to give it a circular shape. I pulled my hair to the right since I started on the left side of my head. As you reach the bottom of your hair near your neck, make sure to have left hair below the ear to swoop into your braid. If you don't leave enough hair on the side for this part you will end up with loose loops directly above your neck. Once you reach the bottom of your head toward your neck and you have no more hair, braid the rest of your locks normally. Upon completing the braid you can put a small elastic to keep it in place before pinning. I simply held onto the tip to keep it braided. Circle your braid up on your head. Make sure the braid lays flat against your head instead of one side of the braid touching your head. Bobby pin the center of your bun then the top, side and bottom. Continue to add bobby pins as needed.

Tip: For hair with lots of layers try curling your hair prior to braiding. Depending on where you are going and if you have adequate time, you can also braid it while it is wet.


Kept nice and simple in the front. I pulled my bangs back for a more ballerina inspired feel. The pop of color from the headband kept the front from looking too drab. 

Side shot just to show how far the twirled braid comes over without being too noticeable from the front view.

Good luck and enjoy your new updo!

Friday, June 29, 2012

Nicole's elegant fishtailed/ braided hair

                   PROM HAIR #2!
My precious friend, Nicole


Such a simple do, but quite a bit elegant.
How to: Start with the bangs or a front section and fish tail it toward the back.
Secure with a hair tie.
Take another section from the other side and braid or fish tail it. 
Continue braiding or fishtailing different sized sections of hair from both sides.

Tip #1: I purposefully kept from doing one section on the right and then one on the left. If you alternate in a set pattern the style will come across as especially uniform.
Tip #2: Just like taking from right sporadically, I did more braids than I did fishtails. This makes the fish tailed sections look more distinguished and yet again, less uniform.

Once you have the desired number of braids or fishtails, cross them over and overlap them to your hearts content until you have a simple maze. 
Take out the hair ties and try to bobby pin the sections where hair will overlap and make a mystery of what is holding the locks in place. 
                            Finish by spraying, add any pins or clips, and enjoy your special night!


Two down, one more prom hair do to post! 
In the mean time, check out McKenzie Truman, my next gal to post about her luxurious lengths.

Saturday, May 19, 2012

40's type Prom Hair

 High School Prom this year turned out to be just as fun as if I had attended it.
                   I had three friends who asked if I would be in town and could do their hair and I jumped at the opportunity to do so! Luckily that specific weekend I came back into Nashville to work with a caterer for a wedding.
                            Out of the three girls that I got to play with their hair, here is the first I'll share.
         
                    Meet Jennifer!

                                             She has gorgeous hair.

 To start out, I curled her hair in medium sized ringlets. After spraying the curls in place, I loosely braided both the right and left sides of Jennifer's hair. To ensure the braids would stay very securely, I ponytailed the braids at the center of her head. Taking large curls or grouping small ones together, I swirled them to lay flat like a slinky. Pin each slinky-section with two or three carefully placed bobby pins. Continue to "slinky" curls until none remains down. 


                      Shake head.... gently.


After seeing what kind of moves, place a few last minute pins and spray the whole thing.
The shaking is just a fun way to ensure the style will stay. You don't want your client's hair to fall when she starts grooving on the dance floor.


Here is lovely Jennifer in her dress.

Saturday, October 8, 2011

Laced Lies

LIE: When styling your hair, it should match your outfit's genre.

LACE: (The beautiful, yet delicate truth to the typical hair myths that girls often buy into) Hair is an accessory just like your clothing. Make it beautiful, make it daring. Make it different. Yes, the style should compliment your outfit, but that shouldn't limit your creativity.

top: Express, many years ago
skirt: the Fashion Shack, a second hand store in South Carolina
boots: Dillards

I love the tight off the shoulder top with the dome of the high waisted skirt. Low cut boots with studs perfected this look. It has a girly-punk vibe. Next step: hair.

With this outfit I wanted my hair to contrast with the sleek edgy look.
Solution: sleek, perfectly groomed hair.

Originally, I pinned my bangs back and sprayed them, but then after they had set, I took the pins out and touched up with some spray.
Treseme Tres Extra Firm Hold is my current favorite. It smells good and it's a reliable product.

Notice, the sides waves back into the style. This adds a bit of a relaxed feel to my otherwise very tight style.

Start out by pulling half your hair into a ponytail, paying particular attention to the way you sweep the sides into a half pony. Then take a piece of hair at the base of your ponytail where it is secured with an elastic, and wrap it around the elastic. Secure with bobby pins underneath your hair. I hid the pins under the portion of half pulled back hair.

Twist the half pony loosely, adding sections of the hair left down until all hair is in the twist. Wrap the twist into a loose bun to the lower right or left near the nape of your neck. Secure with bobby pins. Spray. As the day passes your hair may loosen a bit. As long as it is still in place, let that natural loosening add to your style.

Don't forget to carefully spray back any fly aways for a clean, sleek up do.

Happy Styling!

Wednesday, September 28, 2011

Little bit of this, little bit of that


Dress: Straight up vintage from my lovely Nana
Converse: your local Journey's

Thank you college, you've left my shoe supply quite scarce for when I go back to the parent's house. I like the Converse with this, but only to an extent.

I left some extra bangs down on this style. If I were to style my hair this way again, I'd probably opt for less bangs down to give the style a lighter feel.

A fun little style without too much hassle.

Pull the side with your bangs back by rope braiding two pieces tightly, then secure with bobby pins.
Pull back a larger section of hair from the other side.
Smooth it back and over the bobby pins that secured the rope braid.
Lift up a section of your hair (in my style I did this part of the back left of my head, since the rope braid's bobby pins are on the left), bring the smoothed section of hair under the lifted up section.
Secure with bobby pins.
Depending on fly aways, and your hair's texture, lightly spray.
Right now I'm loving Treseme Tres Two Spray Extra Firm Hold.

Viola!


Here's a closer look at the side to see how much hair I chose to leave down near my bangs.

With this style, I made sure to have a touch of undefined wave to combat the prim and proper feel, therefore complimenting the dress with a diversity.