Monday, August 1, 2011

Forget about your house of cards

LIE: When going for an elegant look, the hair style must be ornate, like a statement of its own.

LACE:(The beautiful, yet delicate truth to the typical hair myths that girls often buy into) When attempting to achieve a certain look, don't confine your hair to one style or another. Instead incorporate several
different styles to make up a completely new style of your own.

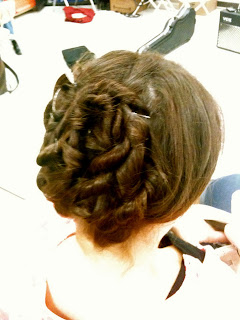
The loose curls dressed up an otherwise typical half up half down do.

Don't let the seemingly simple front fool you. Although this style is pretty basic, the pieces pulled back and twisted lend the back view of this half-do an elegant simplicity.
Make sure to hide the bobby pins by crossing the second section over the first and then pinning that second side underneath the first and out of sight.

Out of sight out of mind...
Your hair style becomes a magic trick!
I finished the look with simple pulled back bangs with a couple loose strands.
Depending on your hair cut, do what fits best with your style.
Happy styling!

Friday, July 29, 2011

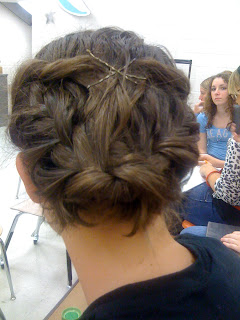
Braids, braids, everywhere braids!


Be inventive!
A limited front and back view

Perfectly simple in the front

As we progress to the back of the head, the pieces should be pulled back elegantly loose
Although you start with elegant swoops, the french braid should be tight from the get go!
Continue the braid diagonally across your head at about the middle, leaving room to curve the braid up to the origin underneath the first braid.
Once you have added all your locks to the french braid, curve it around and up to secure it closely underneath the first part of the braid.
Bobby pin to secure.
Follow with hair spray for any fly aways.

Some other ideas...
A piece of hair from around your face twisted to the back, secure. Then begin with a french braid that upon adding the third section of hair to complete the french braiding process, you twist it under instead of over like usual.

Cross about four to six sections over each other one at a time. Hide the bobby pins with the next piece of crossed hair, then french braid normally.

Thank you, McKenzie, for being a model for this style

A mess of twist and braids twisted together to stay.
Recreating this exact style would present a challenge!

Happy Braiding!

Sunday, July 24, 2011

Baby don't be blue, gonna make for you, gonna make a pie with a heart in the middle

Meet my Nana...
(On the left. The right is my mother.)
This is my Nana when she was young.
She showed me a photo book of some pictures from a while back.
She is to thank for my interest in cooking.
As a tribute to my Nana, here is a recipe that she taught me quite recently.

Coming to South Carolina by myself for a mini road trip/ vacation, my Nana taught me how to make Magic Lemon Meringue Pie. My first thoughts were, "I don't like lemon meringue."
This recipe change my mind!
Here we have the crust. I, as well as my Nana, am health conscious. Typically any sweet I eat has been modified to be less fattening. This recipe was no different, but it did not suffer in the least from the carefully added ingredients.

Crust
1 1/3 cups graham crackers
1/3 cup butter
1/4 cup granulated sugar (Nana substitutes the sugar in the crust for a bit more butter)
1. Preheat the oven to 375 degrees and melt the butter on the stove
2. Crush the graham crackers into find crumbles
3. Mix the butter and graham cracker crumbs
4. Press the buttered crumbles onto the bottom of a pie pan until spread evenly
5. Bake the crust at 375 for 8 minutes
6. Once you remove it from the oven let it chill before putting the lemon mixture into the crust

Lemon Pie Filling
2 egg yolks (Don't forget to save the whites for the meringue)
1 can Eagle Brand sweetened condensed milk
1/2 cup lemon juice (preferably fresh squeezed from lemons)
1 teaspoon grated lemon rind
(The original recipe also calls for 1/4 teaspoon tartar, but I like the pie with a creamy filling instead of a gel like consistency)
1. Preheat the oven (or let it cool from the previous 375 for the crust) to 350 degrees
2. Beat the egg yolks
3. Gradually add the condensed milk, lemon juice, and rind

Meringue
2 egg whites
1/4 cup sugar
1. Beat the egg whites in a separate bowl
2. Gradually add the granulated sugar
3. Beat the mixture until it is still, but not dry

Putting it all together
1. Once the crust has cooled pour the lemon filling into the crust
2. Spread the meringue onto the pie with a knife
3. Bake the pie for 15 minutes or until the meringue is a golden brown
4. Let cool
5. Chill until ready to serve

This picture is before the Meringue is browned (we actually forgot to brown this one)
TA- DA!
And there you have it: you're own Magic Lemon Meringue Pie

Friday, July 22, 2011

Big yellow moon risin' up over them old hills


Lie: Purple Laced Lies only applies to hair.


Lace: Purple Laced Lies is opening a new chapter full of tidbits that are relevant to more than just hair.

A peek at some of the things that could be coming...
Once Upon a Mattress Where I got to be a singing and dancing Nightingale

I captured this photo of my long time friend and mother while celebrating my 18th birthday at the Silly Goose Cafe

Home made miniature kisses. My friend (who blogs as well) Mckenzie's idea therefore named Kenzie Kisses

The view from the swaying hammock that is tethered between two trees in my parents' backyard

Morning pick me up

Alabama

4 o'clock tea party

Breakfast at Opry Land Hotel in Nashville during Beta Convention

Scrumptious home made blackberry pie

The spectacular dress I wanted to buy but alas I could not

The view on the way back to my house after a long day
Boots: Zappos.com

Thursday, July 14, 2011

The best Realizations are the ones you Make for Yourself

PURPLE
LACED
LIES

Headband: an old choker necklace made into a hair accessory

Although I don't particularly care for this picture, I wanted to show the style from the front.
The loose swoop of the front section of hair is essential to offset the otherwise tightly secured style of the fishtail.

A round view from left to right...


How To: Begin the fishtail like you would a french braid, close to the head. Start about two inches above the nape of your neck on either the right or left side. (I started on the right side of my head.) Fishtail the hair across to the opposite side of where you started. Be sure to keep the hair close to your head as you fishtail it. Once you reach the opposite side of your head finish the fishtail process all the way to the tips of your hair. Temporarily secure it with an elastic. Then twist your fish tail around itself as though you are starting to wrap it into a bun. Make sure to wrap it underneath, not over the original fishtail. Simply lay the fishtail closely underneath itself until it reaches where you want it. Bobby pin the base of the half bun to secure it. Then tuck the tip of the fishtail under your hair and secure it as well.
TIP: If you have layers, or even if you just want to make your locks a bit easier to work with, try this while your hair is wet.
An up close shot.

Monday, June 13, 2011

Can you read my mind? Has it come undone? Am I showing signs?

One bored day in show choir...
My friend Mckenzie showed me this updo. I adapted the style to best fit her hair, although the general concept from this picture remained the same.
Although I currently do not have a picture of the front across braid, this what they rest of it looked like. She has a frontal picture of the braid. Eventually I will put it up.
The organized mess of braids is basically two braids swirled into a bun.
I secured the braids with bobby pins where ever Mckenzie's layers stuck out.
How To:
Start on one side near the temple (I started on Mckenzie's right side).
Take a thick section of hair, leaving hair above it to cover where the braid actually starts.
Tightly braid over the bangs on the forehead but don't pull the braid too tight on top of the bangs.
Once you reach the opposite temple from where you started french braid the current braid a little ways into that side.
After french braiding the original braid finish the braid in a normal braid, not a french.
Temporarily secure with an elastic.
On the side that the braid began, braid away from the original forehead braid, careful to cover the first braid's origin, so that no scalp shows.
Temporarily secure with an elastic.
Swirl the two braids together into a bun, making sure to place the braids flat against the head to show the plates of the braid.
Take out the elastics and bobby pin any stray layers.

Saturday, May 21, 2011

I Wear Whatever I Like

LIE: (Not necessarily about hair, but still quite valid) Men's shirts and or hats may not be worn in a classy manner.
LACE:(The beautiful, yet delicate truth to the typical hair myths that girls often buy into) A man's hat or shirt can be a sophisticated look if put together correctly.
Men's hat: Dillards
Men's shirt: My father's closet...
Origin: unknown
Be sure that when you are sporting a large shirt to offset the size with a tighter bottom, like skinny jeans, leggings, ect.
Also in my case, I rolled the sleeves so they wouldn't overtake my arms, belted the waist so it wouldn't make me appear shapeless.
Hair how to: Use a straightener instead of a curling iron for these loose waves.
Curling each moderately small individual section away from the face.
Maneuver the straightener to a slightly turned angle by twisting the tool two or three times.
For a more polished finish, lightly spray the curls once you have completed your style.
The sophistication of this look comes from the mix and match of men's items, dressy gal clothes, and the carefree wavy locks.
Hats make statements.
"I wear whatever I like"